Struts2拦截器
拦截器是作为Servlet过滤器或JDK的Proxy类的概念上是相同的。拦截器允许横切功能单独实施的动作,以及框架。您使用拦截器,可以实现如下:
-
提供预处理前的行动被称为逻辑。
-
提供后处理逻辑的行动被称为后。
-
可供替换的处理,以便能够进行捕获异常。
使用拦截器在Struts2框架提供的功能很多,例如包括异常处理,文件上传,生命周期回调和验证等。事实上,Struts2很多基础拦截功能上,这不是不可能有7或8每个动作拦截分配。
Struts2框架拦截器:
Struts 2框架提供了良好的预配置,并准备使用的盒拦截。下面列出了几个重要的拦截器:
| SN | Interceptor & Description |
|---|---|
| 1 |
alias 允许参数有不同的名称,别名跨请求。 |
| 2 |
checkbox 添加一个参数值为false,不检查的复选框,协助管理复选框。 |
| 3 |
conversionError Places error information from converting strings to parameter types into the action's field errors. |
| 4 |
createSession Automatically creates an HTTP session if one does not already exist. |
| 5 |
debugging Provides several different debugging screens to the developer. |
| 6 |
execAndWait Sends the user to an intermediary waiting page while the action executes in the background. |
| 7 |
exception Maps exceptions that are thrown from an action to a result, allowing automatic exception handling via redirection. |
| 8 |
fileUpload Facilitates easy file uploading. |
| 9 |
i18n Keeps track of the selected locale during a user's session. |
| 10 |
logger Provides simple logging by outputting the name of the action being executed. |
| 11 |
params Sets the request parameters on the action. |
| 12 |
prepare This is typically used to do pre-processing work, such as setup database connections. |
| 13 |
profile Allows simple profiling information to be logged for actions. |
| 14 |
scope Stores and retrieves the action's state in the session or application scope. |
| 15 |
ServletConfig Provides the action with access to various servlet-based information. |
| 16 |
timer Provides simple profiling information in the form of how long the action takes to execute. |
| 17 |
token Checks the action for a valid token to prevent duplicate formsubmission. |
| 18 |
validation Provides validation support for actions |
上述拦截器的完整详细信息,请查看到Struts2文档。但我会告诉你如何使用拦截器,一般在你的Struts应用程序。
如何使用拦截器?
让我们来看看如何使用一个已经存在的拦截我们的“Hello World”程序。我们将使用定时器拦截器,其目的是测量过了多长时间,执行相应的操作方法。同时我用params 拦截器,其目的是发送的请求参数动作。您可以尝试不使用这个拦截器例子,你会发现,name属性没有被设置的参数是不能够达到的动作。
我们将继续HelloWorldAction.java,web.xml中,HelloWorld.jsp和index.jsp文件,因为他们已经创建的实例章节,但让我们如下修改struts.xml文件中添加一个拦截器
<?xml version="1.0" encoding="UTF-8"?>
<!DOCTYPE struts PUBLIC
   "-//Apache Software Foundation//DTD Struts Configuration 2.0//EN"
   "http://struts.apache.org/dtds/struts-2.0.dtd">
<struts>
   <constant name="struts.devMode" value="true" />
   <package name="helloworld" extends="struts-default">
      <action name="hello"
         class="com.tutorialspoint.struts2.HelloWorldAction"
         method="execute">
         <interceptor-ref name="params"/>
         <interceptor-ref name="timer" />
         <result name="success">/HelloWorld.jsp</result>
      </action>
   </package>
</struts>
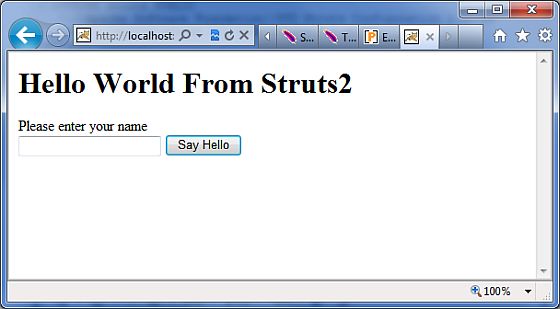
右键点击项目名称,并单击“导出”> WAR文件创建一个WAR文件。然后,这WAR部署在Tomcat的webapps目录下。最后启动Tomcat服务器,并尝试访问URL http://localhost:8080/HelloWorldStruts2/index.jsp。这会给你以下画面:

现在,在给定的文本框中输入任何单词,然后单击“Say Hello按钮执行已定义的动作。现在,如果你将检查生成的日志,你会发现下面的文字:
INFO: Server startup in 3539 ms
27/08/2011 8:40:53 PM
com.opensymphony.xwork2.util.logging.commons.CommonsLogger info
INFO: Executed action [//hello!execute] took 109 ms.
这里的底线是生成的,因为定时器拦截动作,告诉了要执行的共用109ms。
创建自定义拦截器
在应用程序中使用自定义拦截器是一个优雅的方式来提供跨领域的应用功能。创建一个自定义拦截器是很容易的,但需要扩展的接口,下面是Interceptor接口:
public interface Interceptor extends Serializable{
   void destroy();
   void init();
   String intercept(ActionInvocation invocation)
   throws Exception;
}
正如其名称所提示的,在init()方法提供了一种方法来初始化拦截器的destroy()方法提供了一个拦截器清理设施。不同的动作,拦截器的请求重用和需要是线程安全的,特别是在intercept()方法。
ActionInvocation对象提供的运行时环境。它允许访问的动作本身和方法调用的行动和决定的动作是否已经调用。
如果您有没有必要的初始化或清理代码,AbstractInterceptor类可以扩展。这提供了一个默认的无操作实现的init()和destroy()方法。
创建拦截器类:
让我们在Java资源> src文件夹创建MyInterceptor.java:
package com.tutorialspoint.struts2;

import java.util.*;
import com.opensymphony.xwork2.ActionInvocation;
import com.opensymphony.xwork2.interceptor.AbstractInterceptor;

public class MyInterceptor extends AbstractInterceptor {

   public String intercept(ActionInvocation invocation)throws Exception{

      /* let us do some pre-processing */
      String output = "Pre-Processing";
      System.out.println(output);

      /* let us call action or next interceptor */
      String result = invocation.invoke();

      /* let us do some post-processing */
      output = "Post-Processing";
      System.out.println(output);

      return result;

   }
}
就像你看到的,用实际的动作将被执行的的拦截器由invocation.invoke()调用。所以,你可以做一些前处理和后处理根据您的需要。
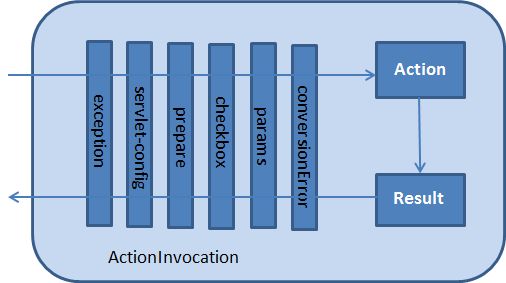
框架本身开始的过程,在第一次调用ActionInvocation对象的invoke()。每次invoke()被调用,ActionInvocation咨询的状态,并执行拦截器来下。当所有配置的拦截器被调用,invoke()方法将导致要执行的动作本身。通过请求流以下数据图显示了相同的概念:

创建动作类:
让我们创建一个Java文件HelloWorldAction.java 在“Java资源> SRC”下一个的包名com.tutorialspoint.struts2中有下面的内容。
package com.tutorialspoint.struts2;

import com.opensymphony.xwork2.ActionSupport;

public class HelloWorldAction extends ActionSupport{
   private String name;

   public String execute() throws Exception {
      System.out.println("Inside action....");
      return "success";
   }

   public String getName() {
      return name;
   }

   public void setName(String name) {
      this.name = name;
   }
}
在前面的例子中,我们已经看到,这是一个相同的类。我们有标准的“name”属性的getter和setter方法,返回字符串“success”的执行方法。
创建视图-View
让我们创建下面的JSP文件helloWorld.jsp,在你的eclipse项目的WebContent文件夹在。
<%@ page contentType="text/html; charset=UTF-8" %>
<%@ taglib prefix="s" uri="/struts-tags" %>
<html>
<head>
<title>Hello World</title>
</head>
<body>
   Hello World, <s:property value="name"/>
</body>
</html>
创建主页面:
我们还需要在WebContent文件夹中创建的index.jsp。该文件将作为初始动作URL,用户可以直接点击告诉Struts 2框架调用的HelloWorldAction类定义的方法并渲染HelloWorld.jsp视图。
<%@ page language="java" contentType="text/html; charset=ISO-8859-1"
   pageEncoding="ISO-8859-1"%>
<%@ taglib prefix="s" uri="/struts-tags"%>
   <!DOCTYPE html PUBLIC "-//W3C//DTD HTML 4.01 Transitional//EN"
"http://www.w3.org/TR/html4/loose.dtd">
<html>
<head>
<title>Hello World - by www.gitbook.net</title>
</head>
<body>
   <h1>Hello World From Struts2</h1>
   <form action="hello">
      <label for="name">Please enter your name</label><br/>
      <input type="text" name="name"/>
      <input type="submit" value="Say Hello"/>
   </form>
</body>
</html>
hello操作定义在上面的视图文件将被映射到的HelloWorldAction类和它的执行方法使用struts.xml文件。
配置文件
现在,我们需要注册我们的拦截器,然后调用它,因为我们已经在前面的例子中默认的拦截器。要注册一个新定义的拦截器,<interceptors>... </interceptors>标签放置直接下的<package>标签在struts.xml文件。您可以跳过这一步,因为我们没有一个默认的拦截器在前面的例子。但在这里,让我们的注册和使用,如下所示:
<?xml version="1.0" encoding="UTF-8"?>
<!DOCTYPE struts PUBLIC
    "-//Apache Software Foundation//DTD Struts Configuration 2.0//EN"
    "http://struts.apache.org/dtds/struts-2.0.dtd">

<struts>
   <constant name="struts.devMode" value="true" />
   <package name="helloworld" extends="struts-default">

      <interceptors>
         <interceptor name="myinterceptor"
            class="com.tutorialspoint.struts2.MyInterceptor" />
      </interceptors>

      <action name="hello"
         class="com.tutorialspoint.struts2.HelloWorldAction"
         method="execute">
         <interceptor-ref name="params"/>
         <interceptor-ref name="myinterceptor" />
         <result name="success">/HelloWorld.jsp</result>
      </action>

   </package>
</struts>
应该注意的是,你可以注册多个拦截器<package>标签内,同一时间,你可以调用多个拦截器内的<action>标签。你可以调用相同的拦截器与不同的动作。
需要创建WEB-INF文件夹下WebContent的web.xml文件如下:
<?xml version="1.0" encoding="UTF-8"?>
<web-app xmlns:xsi="http://www.w3.org/2001/XMLSchema-instance"
   xmlns="http://java.sun.com/xml/ns/javaee"
   xmlns:web="http://java.sun.com/xml/ns/javaee/web-app_2_5.xsd"
   xsi:schemaLocation="http://java.sun.com/xml/ns/javaee
   http://java.sun.com/xml/ns/javaee/web-app_3_0.xsd"
   id="WebApp_ID" version="3.0">

   <display-name>Struts 2</display-name>
   <welcome-file-list>
      <welcome-file>index.jsp</welcome-file>
   </welcome-file-list>
   <filter>
      <filter-name>struts2</filter-name>
      <filter-class>
         org.apache.struts2.dispatcher.FilterDispatcher
      </filter-class>
   </filter>

   <filter-mapping>
      <filter-name>struts2</filter-name>
      <url-pattern>/*</url-pattern>
   </filter-mapping>
</web-app>
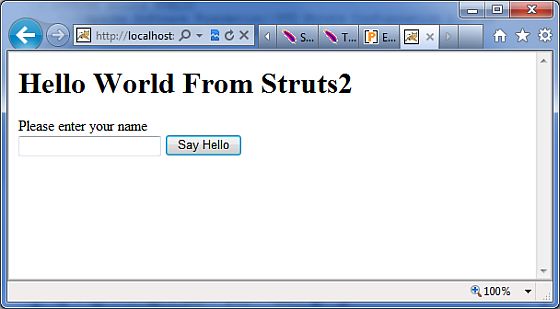
右键点击项目名称,并单击“导出”> WAR文件创建一个WAR文件。然后,这WAR部署在Tomcat的webapps目录下。最后,启动Tomcat服务器,并尝试访问URL http://localhost:8080/HelloWorldStruts2/index.jsp。这会给你以下画面:

现在,在给定的文本框中输入任何单词,然后单击“Say Hello按钮执行已定义的动作。现在,如果查看生成的日志会发现下面的文字在底部:
Pre-Processing
Inside action....
Post-Processing
堆叠多个拦截器:
正如你可以想像,配置多个拦截器的每个动作很快就会变得非常难以控制的。出于这个原因,拦截器的拦截器栈管理。下面是一个例子,直接从在struts-default.xml文件:
<interceptor-stack name="basicStack">
   <interceptor-ref name="exception"/>
   <interceptor-ref name="servlet-config"/>
   <interceptor-ref name="prepare"/>
   <interceptor-ref name="checkbox"/>
   <interceptor-ref name="params"/>
   <interceptor-ref name="conversionError"/>
</interceptor-stack>
上述权被称为basicStack,并且可以用于在您的配置中,如下所示。此配置节点被放置下<package.../>节点。每个<interceptor-ref.../>标签引用了一个拦截器或拦截器栈已配置在当前的拦截器栈。因此,这是非常重要的,以确保名称是唯一在所有拦截器和拦截器栈配置时,配置初始拦截器和拦截器栈。
我们已经看到了如何应用拦截器的作用,应用拦截器栈是没有什么不同。事实上,我们都使用完全相同的标签:
<action name="hello" class="com.tutorialspoint.struts2.MyAction">
   <interceptor-ref name="basicStack"/>
   <result>view.jsp</result>
</action
所有上面的6个拦截器,上述登记注册完成“basicStack”的hello操作。应该看出拦截器执行的顺序。例如,在上述情况下,异常将被执行第一,第二servlet的配置等。
