Struts2 <s:password>密码示例
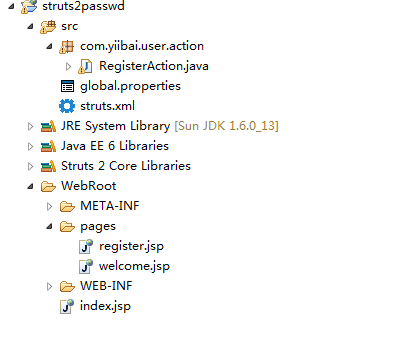
在这一章节中,我们创建一个Web工程为:struts2passwd,演示<s:password>的使用。完整的工程目录结构如下:

在Struts2中,可以使用<s:password>来创建HTML密码字段。例如,可以声明“s:password”键属性或者标签和名称属性。
<s:password key="password" />
//or
<s:textfield label="Password" name="password" />
两者都产生相同的HTML输出(在默认的XHTML主题)。
<td class="tdLabel">
  <label for="registerUser_password" class="label">Password:</label>
</td>
<td>
  <input type="password" name="password" id="registerUser_password"/>
</td>
Struts2 <s:password> 示例
一个页面,“密码”和“确认密码”字段,并做了验证,以确保“确认密码”是与“密码”相匹配。
1. 属性文件
global.properties
#Global messages
username = 用名名
password = 密码
confirmPassword = 确认密码
submit = 提交
RegisterAction.properties
#error message
username.required = Username is required
password.required = Password is required
cpassword.required = Confirm password is required
cpassword.notmatch = Confirm password is not match
2. 动作 - Action
RegisterAction.java
package com.yiibai.user.action;

import com.opensymphony.xwork2.ActionSupport;

public class RegisterAction extends ActionSupport{

	private String username;
	private String password;
	private String confirmPassword;

	public String getPassword() {
		return password;
	}

	public void setPassword(String password) {
		this.password = password;
	}

	public String getConfirmPassword() {
		return confirmPassword;
	}

	public void setConfirmPassword(String confirmPassword) {
		this.confirmPassword = confirmPassword;
	}

	public String getUsername() {
		return username;
	}

	public void setUsername(String username) {
		this.username = username;
	}

	//business logic
	public String execute() {

		return "SUCCESS";

	}

	//simple validation
	public void validate(){
		if("".equals(getUsername())){
			addFieldError("username", getText("username.required"));
		}
		if("".equals(getPassword())){
			addFieldError("password", getText("password.required"));
		}
		if("".equals(getConfirmPassword())){
			addFieldError("confirmPassword", getText("cpassword.required"));
		}

		if(!(getPassword().equals(getConfirmPassword()))){
			addFieldError("confirmPassword", getText("cpassword.notmatch"));
		}
	}

}
3. 视图页面
结果页面使用 Struts2 的“s:password”标签来创建一个HTML密码字段。
register.jsp
<%@ taglib prefix="s" uri="/struts-tags" %>
<html>
<head>
</head>

<body>
<h1>Struts 2 - password 示例</h1>

<s:form action="registerUser" namespace="/user">

	<s:textfield key="username" />
	<s:password key="password" />
	<s:password key="confirmPassword" />

	<s:submit key="submit" name="submit" />

</s:form>

</body>
</html>
welcome.jsp
<%@ page contentType="text/html;charset=UTF-8" %>
<%@ taglib prefix="s" uri="/struts-tags" %>
<html>

<body>
<h1>Struts 2 - password 示例</h1>

<h2>Password : <s:property value="password"/></h2>
<h2>Confirm Password : <s:property value="%{confirmPassword}"/></h2>

</body>
</html>
4. struts.xml
<?xml version="1.0" encoding="UTF-8" ?>
<!DOCTYPE struts PUBLIC
"-//Apache Software Foundation//DTD Struts Configuration 2.0//EN"
"http://struts.apache.org/dtds/struts-2.0.dtd">

<struts>

   <constant name="struts.custom.i18n.resources" value="global" />
   <constant name="struts.devMode" value="true" />

   <package name="user" namespace="/user" extends="struts-default">
	<action name="register">
		<result>/pages/register.jsp</result>
	</action>
	<action name="registerUser"
                class="com.yiibai.user.action.RegisterAction">
		<result name="SUCCESS">/pages/welcome.jsp</result>
		<result name="input">/pages/register.jsp</result>
	</action>
   </package>

</struts>
5. 运行示例
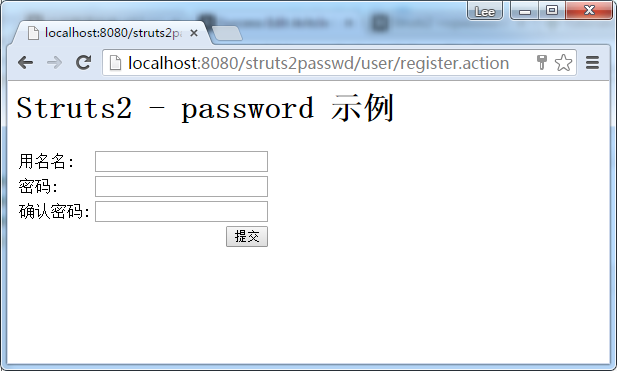
http://localhost:8080/struts2passwd/user/register.action


