Struts2快速入门
Struts2是基于MVC设计模式的流行和成熟的Web应用程序框架。Struts2并不只是Struts 1下一个版本,但它是一个完全重写的Struts架构。
WebWork框架开始了与Struts框架为基础,其目标是建立在Struts的Web开发更容易为开发人员提供了加强和改进的框架。
一段时间后,WebWork框架和Struts社区联手打造著名的Struts2框架。
Struts 2 框架特性:
这里有一些伟大的特性,可能会迫使你考虑使用Struts2:
-
POJO形式和POJO动作 - 已经摆脱了Struts2的动作表单的Struts框架的一个组成部分。Struts2可以使用任何的POJO接收的形式输入。同样的,你现在可以看到任何POJO的Action类。
-
Tag支持 - Struts2的形式提高了标签的新标签让开发人员写更少的代码。
-
AJAX支持- Struts2中已经认识到了Web2.0技术,并整合到产品中AJAX支持创建AJAX的标签,该功能非常相似的标准Struts2的标签。
-
模板支持 - 支持生成使用模板。
-
插件支持 - 核心Struts2行为,可以加强和扩大使用插件。大量的插件可供Struts2。
-
概要分析- Struts2的提供集成的配置,调试和分析应用程序。此外,Struts还提供了内置调试工具的帮助下,集成调试。
-
标签修改容易 - 在Struts2标签标记,可以调整使用FreeMarker模板。这并不需要JSP或Java知识。基本的HTML,XML和CSS知识是不够的修改的标签。
-
提升更少的配置 - Struts2的促进更少的配置与用于各种设置的帮助下,使用默认值。你没有的东西,除非它偏离由Struts2的默认设置的配置。
Struts 2 环境配置:
我们的首要任务是要得到一个最小的Struts2中运行的应用程序。本章将指导您如何使用Struts2编写一个应用程序。我假设你已经在你的机器上安装JDK(5+),Tomcat和Eclipse。如果你没有安装这些组件,请执行以下步骤:
Step 1 - 设置JAVA开发工具包 (JDK):
从Oracle的Java站点:Java SE下载,您可以下载最新版本的SDK。您会发现说明安装JDK下载的文件,按照给定的说明来安装和配置的设置。最后,设置PATH和JAVA_HOME环境变量指向的目录,其中包含java和javac,通常分别为:java_install_dir/bin和java_install_dir。
如果运行的是Windows SDK安装在c:\jdk1.5.0_20,你就必须把你的C:\autoexec.bat文件中的以下行。
set PATH=C:\jdk1.5.0_20\bin;%PATH%
set JAVA_HOME=C:\jdk1.5.0_20
另外,在Windows NT/2000/XP中,您也可以右键单击“我的电脑”,选择“属性”,再先进,环境变量。然后,您会更新PATH的值,然后按“确定”按钮。
在Unix(Solaris和Linux等),如果SDK安装在/usr/local/jdk1.5.0_20,你使用的是C shell,把下面的到.cshrc文件写入。
setenv PATH /usr/local/jdk1.5.0_20/bin:$PATH
setenv JAVA_HOME /usr/local/jdk1.5.0_20
另外,如果你使用像Borland的JBuilder,Eclipse的IntelliJ IDEA或Sun ONE Studio集成开发环境(IDE),编译并运行一个简单的程序,以确认该IDE知道在哪里安装Java,否则不正确的设置为给定的文档IDE。
Step 2 - 安装Apache Tomcat:
您可以下载最新版本Tomcat http://tomcat.apache.org/。一旦下载安装,解压缩的二进制分发到一个方便的位置。例如,Window下在C:\Apache或/usr/local/apache-tomcat-6.0.33 tomcat-6.0.33 Linux/Unix和创建CATALINA_HOME环境变量指向这些位置上。Tomcat可以开始执行下面的命令在Windows机器上,可以简单地双击的startup.bat
 %CATALINA_HOME%\bin\startup.bat
 or
 C:\apache-tomcat-6.0.33\bin\startup.bat
Tomcat可以开始UNIX(Solaris和Linux等)的机器上执行下面的命令:
$CATALINA_HOME/bin/startup.sh
or
/usr/local/apache-tomcat-6.0.33/bin/startup.sh
成功启动后,默认包含在Tomcat中的Web应用程序将可以通过访问输入http://localhost:8080/。如果一切顺利,那么它应该显示以下结果:
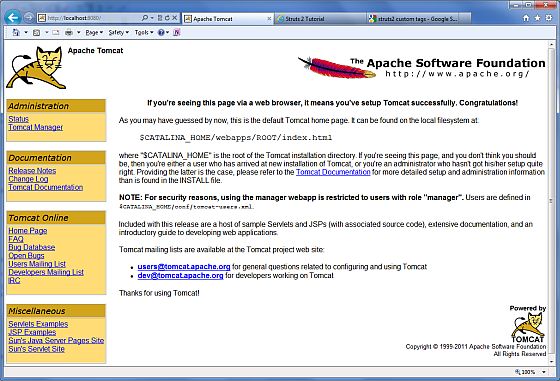
有关配置和运行Tomcat的进一步信息包含在文档中,可以找到这里,以及在Tomcat Web站点:http://tomcat.apache.org
停止Tomcat既可以通过Windows机器上执行下面的命令:
%CATALINA_HOME%\bin\shutdown
or

C:\apache-tomcat-5.5.29\bin\shutdown
Tomcat可以停止执行下面命令在Unix(Solaris和Linux等)机器:
$CATALINA_HOME/bin/shutdown.sh
or
/usr/local/apache-tomcat-5.5.29/bin/shutdown.sh
Step 3 - 安装Eclipse (IDE)
在本在线教程中所有的例子已经写入使用Eclipse IDE。所以,我建议你有你的机器上安装最新版本Eclipse。
要安装Eclipse的dDownload的最新的Eclipse二进制文件http://www.eclipse.org/downloads/。一旦你下载安装,解压缩的二进制分发到一个方便的位置。例如,在C:\eclipse上Eclipse,或/usr/local/eclipse在Linux/Unix终于适当设置PATH变量。
Eclipse可以启动Windows机器上执行下面的命令,或者你可以简单地双击的eclipse.exe
%C:\eclipse\eclipse.exe
Eclipse可以启动UNIX(Solaris和Linux等)的机器上执行下面的命令:
$/usr/local/eclipse/eclipse
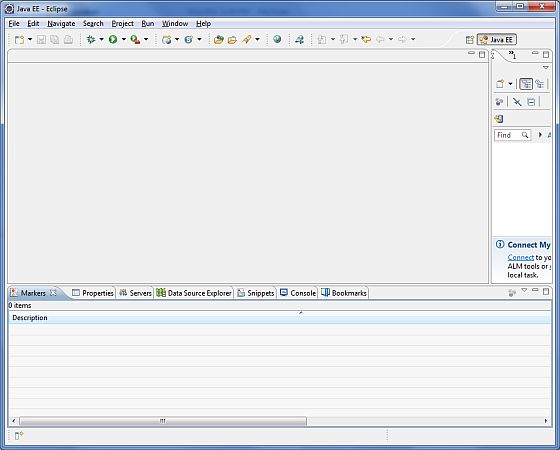
成功启动后,如果一切正常,那么它应显示以下结果:
Step 4 - 安装Struts2 类库
现在,如果一切正常,那么你可以继续设置您的Struts 2框架。以下是简单的步骤,下载并安装在机器上Struts2。
-
请选择是否要安装Hibernate在Windows或Unix,然后继续进行下一个步骤下载.zip文件窗口.tz文件为Unix。
-
下载最新版本的Struts2的二进制文件: http://struts.apache.org/download.cgi.
-
在写这篇在线教程的时候,我下载的是struts-2.0.14-all.zip,当解压下载的文件时,它有C:\struts-2.2.3如下的目录结构内。
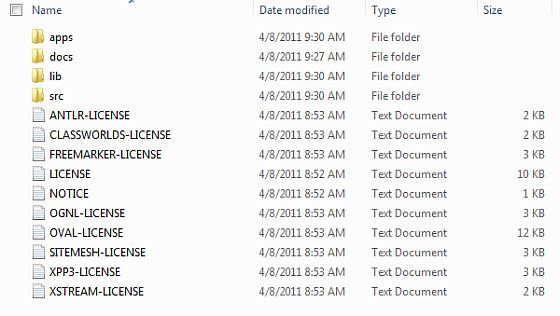
第二个步骤是解压zip文件中的任何位置,我下载和提取struts-2.2.3-all.zip在c:\文件夹中,我的Windows 7机器上的所有jar文件复制到c:\struts-2.20.3\lib中。确保正确设置CLASSPATH变量,否则将出现错误问题,同时运行您的应用程序。
Struts 2 体系结构:
从高层次来看,Struts2是一个上拉MVC(MVC2)框架。在Struts2的Model-View-Controller模式实现以下五个核心组件:
-
Actions
-
Interceptors
-
Value Stack / OGNL
-
Results / Result types
-
View technologies
Struts 2的是从传统的MVC框架,在该框架中的作用的模式,而不是控制器的作用略有不同,虽然有一些重叠。
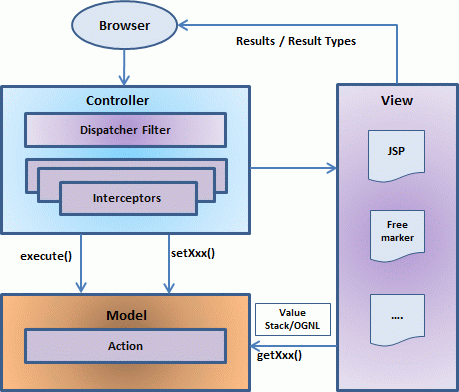
上图描述了Struts2的高层体系结构模型,视图和控制器。一个Struts2的调度Servlet过滤器和拦截器与控制器实现,该模型实现的动作和视图的组合的结果类型和结果。值栈和OGNL提供了共同点,其他部件之间的连接和集成。
除了从上述组分中,将有一个特定的信息涉及到配置。为Web应用程序的配置以及配置动作,拦截器,结果等。
这是Struts的MVC模式的体系结构概述。我们将在随后的章节中通过每个组件更详细地熟悉和理解。
请求生命周期:
基于上述数据图,可以解释用户的请求的生命周期在Struts 2如下所示:
-
用户发送请求到服务器,用于请求对某些资源(即页).
-
FilterDispatcher排着眼于该请求,然后确定适当的Action.
-
配置拦截器的功能适用于如验证,文件上传等。
-
选择的动作执行,执行所请求的操作。
-
同样,配置拦截器做任何后期处理,如果需要的话。
-
最后的结果是由视图准备,并且将结果返回给用户。
Struts 2 Hello World 实例:
从中学到了Struts 2的架构,当你点击一个超链接或提交一个Struts2的Web应用程序的HTML表单中,输入被发送到一个Java类操作的控制器,收集。执行该操作后,结果选择了一个资源来呈现的响应。资源通常是一个JSP,但它也可以是一个PDF文件,Excel电子表格,或Java小应用程序窗口。
假设你已经建立您的开发环境。现在,让我们继续建立我们的第一个Hello World struts2的项目。这个项目的目的是建立一个Web应用程序,收集用户的username,并显示“Hello World”,后面的用户名。我们将创建任何Struts2项目的四个组成部分:
| SN | 组件&描述 |
|---|---|
| 1 |
Action Create an action class which will contain complete business logic and conrol the interaction between the user, the model, and the view. |
| 2 |
Interceptors Create interceptors if required, or use existing interceptors. This is part of Controller. |
| 3 |
View Create a JSPs to interact with the user to take input and to present the final messages. |
| 4 |
Configuration Files Create configuration files to couple the Action, View and Controllers. These files are struts.xml, web.xml, struts.properties. |
我要使用Eclipse IDE,所以下创建一个动态Web项目所需的所有组件。因此,让我们开始创建动态Web项目。
创建一个动态Web项目:
开始你的Eclipse,然后进入“文件”>“新建”>“动态Web项目,然后输入项目名称为HelloWorldStruts2和设置其他的选项,在下面的屏幕:
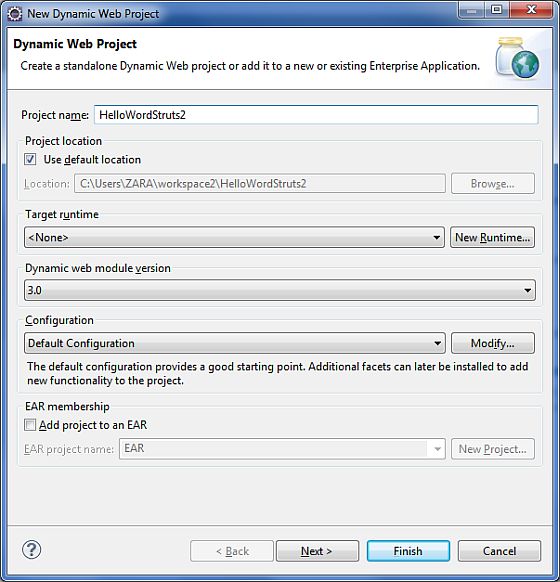
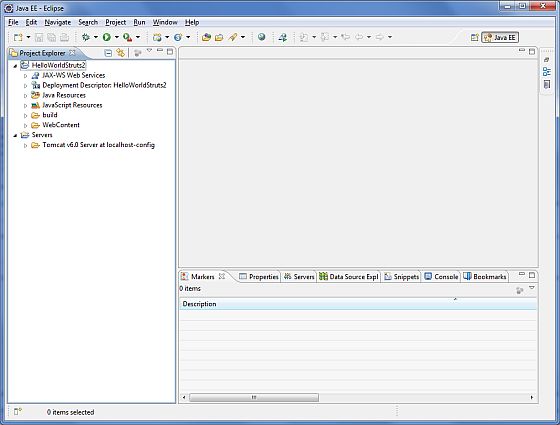
选择在屏幕上的所有默认选项,最后检查生成的web.xml部署描述符选项。这将创建一个动态Web项目在Eclipse中。现在去窗口>显示视图>项目资源管理器,你会看到你的项目窗口中的东西如下:
现在复制以下文件从Struts 2的lib文件夹C:\struts-2.2.3\lib添加到我们的工程WEB-INF\lib文件夹中。所以这个可以简单地拖动和丢弃所有的WEB-INF\lib文件夹中的下列文件到。
-
commons-fileupload-x.y.z.jar
-
commons-io-x.y.z.jar
-
commons-lang-x.y.jar
-
commons-logging-x.y.z.jar
-
commons-logging-api-x.y.jar
-
freemarker-x.y.z.jar
-
javassist-.xy.z.GA
-
ognl-x.y.z.jar
-
struts2-core-x.y.z.jar
-
xwork-core.x.y.z.jar
创建动作action类:
Action类是Struts 2应用程序的关键,我们实现了大部分Action类中的业务逻辑。因此,让我们创建一个Java文件HelloWorldAction.java的Java资源> SRC下一个的包名com.yiibai.struts2并有下面的内容。
Action类来响应用户的操作,当用户点击一个URL。 Action类中的一个或多个方法被执行,并返回一个字符串结果。基于结果的价值,一个特定的JSP页面的呈现方式。
package com.yiibai.struts2;

public class HelloWorldAction{
   private String name;

   public String execute() throws Exception {
      return "success";
   }

   public String getName() {
      return name;
   }

   public void setName(String name) {
      this.name = name;
   }
}
这是一个非常简单的类,一个名为“name”属性。我们有标准“名称”属性getter和setter方法,返回字符串“SUCCESS”执行方法。
Struts2框架的HelloWorldAction类将创建一个对象并调用execute方法在响应用户的操作。你把业务逻辑里面execute方法,并最终返回的字符串常量。简单地说为每个URL执行一个动作类,或者你可以直接使用这个类的名称作为操作名,也可以映射到一些其他的名称使用struts.xml文件,如下图所示。
创建一个视图
我们需要一个JSP提交最后的消息,这个页面会被称为Struts 2框架中预定义的动作时,会发生此映射将在struts.xml文件中定义的。所以,让我们创建下面的JSP文件的helloWorld.jsp,在WebContent文件夹在您的Eclipse项目。要做到这一点,右键单击WebContent文件夹中的项目资源管理器,然后选择“新建”>“JSP文件。
<%@ page contentType="text/html; charset=UTF-8" %>
<%@ taglib prefix="s" uri="/struts-tags" %>
<html>
<head>
<title>Hello World</title>
</head>
<body>
   Hello World, <s:property value="name"/>
</body>
</html>
taglib指令告诉Servlet容器中,这个页面将使用Struts2标签,这些标签之前,将通过s:property标签中显示的动作类的属性名称>HelloWorldAction类的getName()方法返回的值。
创建主页面:
我们还需要在WebContent文件夹中创建的index.jsp。该文件将作为初始动作URL,用户可以直接点击告诉Struts 2框架调用的HelloWorldAction类定义的方法,使HelloWorld.jsp视图。
<%@ page language="java" contentType="text/html; charset=ISO-8859-1"
   pageEncoding="ISO-8859-1"%>
<%@ taglib prefix="s" uri="/struts-tags"%>
   <!DOCTYPE html PUBLIC "-//W3C//DTD HTML 4.01 Transitional//EN"
"http://www.w3.org/TR/html4/loose.dtd">
<html>
<head>
<title>Hello World</title>
</head>
<body>
   <h1>Hello World From Struts2</h1>
   <form action="hello">
      <label for="name">Please enter your name</label><br/>
      <input type="text" name="name"/>
      <input type="submit" value="Say Hello"/>
   </form>
</body>
</html>
hello操作定义在上面的视图文件将被映射到的HelloWorldAction类和它的执行方法使用struts.xml文件。当用户点击“提交”按钮,它会导致Struts2框架运行执行方法定义在其中,HelloWorldAction类和方法的返回值的基础上,将相应的视图选择和呈现的一种反应。
配置文件
我们需要一个映射,以配合URL,HelloWorldAction类(模型),HelloWorld.jsp(图)。映射告诉Struts 2框架的类将响应用户的操作(URL),这一类的方法将被执行,什么视图来显示字符串结果的基础上,该方法返回。
因此,让我们创建一个名为struts.xml中。由于Struts2要求struts.xml中存在的类文件夹中。因此,创建的WebContent/WEB-INF/classes文件夹下struts.xml文件。Eclipse不会创建“类”文件夹下,所以你需要自己做。要做到这一点,在项目浏览器和WEB-INF文件夹上点击右键,选择“新建”>“文件夹”。你的struts.xml中应该是这样的:
<?xml version="1.0" encoding="UTF-8"?>
<!DOCTYPE struts PUBLIC
   "-//Apache Software Foundation//DTD Struts Configuration 2.0//EN"
   "http://struts.apache.org/dtds/struts-2.0.dtd">
<struts>
<constant name="struts.devMode" value="true" />
   <package name="helloworld" extends="struts-default">

      <action name="hello"
            class="com.yiibai.struts2.HelloWorldAction"
            method="execute">
            <result name="success">/HelloWorld.jsp</result>
      </action>
   </package>
</struts>
上面的配置文件的几句话。在这里,我们设置常数struts.devModeto为true,因为我们需要看到一些有用的日志消息。我们再定义一个名为HelloWorld包。创建一个包是有用的,当你想要创建新的动作。在我们的例子中,我们的行动命名为“hello”相应的URL/hello.action和备份HelloWorldAction.class。执行方法HelloWorldAction.class方法被调用时运行URL/hello.action。如果结果execute方法返回“success”,那么我们就用户HelloWorld.jsp。
下一步是创建一个web.xml文件,该文件的任何请求的入口点到Struts2。Struts2的应用程序的入口点,将是一个部署描述符(web.xml)中定义的过滤器。因此,我们将定义在web.xml中一个条目oforg.apache.struts2.dispatcher.FilterDispatcher类。WebContent下WEB-INF文件夹下需要创建web.xml文件。 Eclipse已经在创建项目时创建了一个web.xml文件。但是我们还需要修改如下:
<?xml version="1.0" encoding="UTF-8"?>
<web-app xmlns:xsi="http://www.w3.org/2001/XMLSchema-instance"
   xmlns="http://java.sun.com/xml/ns/javaee"
   xmlns:web="http://java.sun.com/xml/ns/javaee/web-app_2_5.xsd"
   xsi:schemaLocation="http://java.sun.com/xml/ns/javaee
   http://java.sun.com/xml/ns/javaee/web-app_3_0.xsd"
   id="WebApp_ID" version="3.0">

   <display-name>Struts 2</display-name>
   <welcome-file-list>
      <welcome-file>index.jsp</welcome-file>
   </welcome-file-list>
   <filter>
      <filter-name>struts2</filter-name>
      <filter-class>
         org.apache.struts2.dispatcher.FilterDispatcher
      </filter-class>
   </filter>

   <filter-mapping>
      <filter-name>struts2</filter-name>
      <url-pattern>/*</url-pattern>
   </filter-mapping>
</web-app>
我们已经指定index.jsp是我们欢迎(welcome)文件。我们已经配置Struts2过滤器上运行的所有URL(即,任何URL匹配模式/*)
启用详细的日志:
可以启用日志记录功能齐全,工作时用Struts 2的WEB-INF/classes文件夹下创建logging.properties文件。请在属性文件中的以下两行:
org.apache.catalina.core.ContainerBase.[Catalina].level = INFO
org.apache.catalina.core.ContainerBase.[Catalina].handlers = \
                              java.util.logging.ConsoleHandler
默认logging.properties指定ConsoleHandler的路由记录到stdout或FileHandler。一个处理程序的日志级别阈值可以设置使用ERROR,WARNING,INFO,CONFIG,FINE,FINER,FINEST或全部。
就是这样。我们已经准备好来运行我们的Hello World应用程序使用Struts 2框架。
执行应用程序
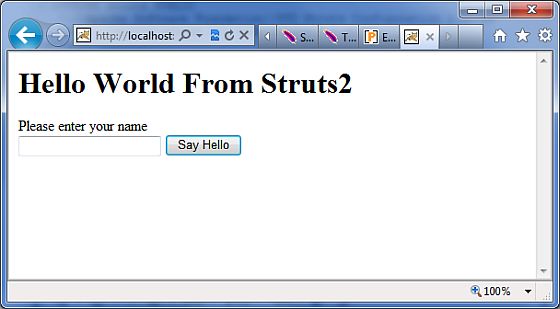
右键点击项目名称,并单击“导出”> WAR文件创建一个WAR文件。然后,这WAR部署在Tomcat的webapps目录下。最后,启动Tomcat服务器,并尝试访问URL http://localhost:8080/HelloWorldStruts2/index.jsp。这会给你以下画面:
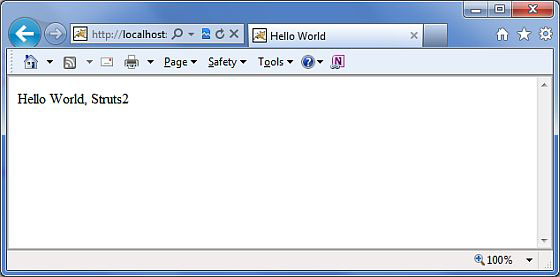
输入值为"Struts2",并提交页面。您应该看到下一页
请注意,您可以定义索引动作在struts.xml文件,在这种情况下,你可以调用索引页http://localhost:8080/HelloWorldStruts2/index.action。检查下面你可以定义索引的行动:
<?xml version="1.0" encoding="UTF-8"?>
<!DOCTYPE struts PUBLIC
   "-//Apache Software Foundation//DTD Struts Configuration 2.0//EN"
   "http://struts.apache.org/dtds/struts-2.0.dtd">
<struts>
<constant name="struts.devMode" value="true" />
   <package name="helloworld" extends="struts-default">

      <action name="index">
            <result >/index.jsp</result>
      </action>

      <action name="hello"
            class="com.yiibai.struts2.HelloWorldAction"
            method="execute">
            <result name="success">/HelloWorld.jsp</result>
      </action>

   </package>
</struts>
Struts 2 配置文件
本章将带你通过一个Struts2应用程序所需的基本配置。在这里,我们将看到在一些重要的配置文件,将配置文件:web.xml,struts.xml中,struts-config.xml和struts.properties
老实说你能活下来使用web.xml和struts.xml中的配置文件,并在前面的章节中,你已经看到我们的例子中使用这两个文件的工作,但让我解释一下其他文件,以及你的知识。
web.xml文件:
在web.xml配置文件是一个的J2EE配置文件,决定如何处理HTTP请求servlet容器的元素。它不是严格意义上的Struts2的配置文件,但它是一个文件,需要配置Struts2的工作。
正如前面所讨论的,此文件提供任何Web应用程序的入口点。Struts2的应用程序的入口点,将是一个部署描述符(web.xml)中定义的过滤器。因此,我们将FilterDispatcher排类在web.xml中定义一个条目。需要创建文件夹的WebContent/ WEB-INF下的web.xml文件。
这是第一个配置文件,您将需要配置,如果你开始没有产生它(例如Eclipse或者Maven2的)模板或工具的帮助下。以下是web.xml文件中的内容,我们在我们的最后一个例子。
<?xml version="1.0" encoding="UTF-8"?>
<web-app xmlns:xsi="http://www.w3.org/2001/XMLSchema-instance"
   xmlns="http://java.sun.com/xml/ns/javaee"
   xmlns:web="http://java.sun.com/xml/ns/javaee/web-app_2_5.xsd"
   xsi:schemaLocation="http://java.sun.com/xml/ns/javaee
   http://java.sun.com/xml/ns/javaee/web-app_3_0.xsd"
   id="WebApp_ID" version="3.0">

   <display-name>Struts 2</display-name>
   <welcome-file-list>
      <welcome-file>index.jsp</welcome-file>
   </welcome-file-list>

   <filter>
      <filter-name>struts2</filter-name>
      <filter-class>
         org.apache.struts2.dispatcher.FilterDispatcher
      </filter-class>
   </filter>

   <filter-mapping>
      <filter-name>struts2</filter-name>
      <url-pattern>/*</url-pattern>
   </filter-mapping>

</web-app>
需要注意的是,我们的Struts 2的过滤器映射到/*/*。行动,而不是这意味着所有的URL将被解析的支柱过滤器。我们将介绍时,我们会通过的“注解”一章。
struts.xml文件:
struts.xml文件中包含的配置信息,你将修改所采取的措施的开发。这个文件可以被用来覆盖默认设置的应用程序,例如struts.devMode=false和其他设置中定义的属性文件。这个文件可以创建文件夹下的WEB-INF/classes。
让我们一起来看看我们在struts.xml文件中创建Hello World的例子在前面的章节中解释。
<?xml version="1.0" encoding="UTF-8"?>
<!DOCTYPE struts PUBLIC
   "-//Apache Software Foundation//DTD Struts Configuration 2.0//EN"
   "http://struts.apache.org/dtds/struts-2.0.dtd">
<struts>
   <constant name="struts.devMode" value="true" />
   <package name="helloworld" extends="struts-default">

      <action name="hello"
            class="com.yiibai.struts2.HelloWorldAction"
            method="execute">
            <result name="success">/HelloWorld.jsp</result>
      </action>
      <-- more actions can be listed here -->

   </package>
   <-- more packages can be listed here -->

</struts>
首先要注意的是DOCTYPE。所有的Struts配置文件中需要有正确的DOCTYPE,在我们的小例子所示。<struts>是根标记的元素,我们声明使用不同的包<package>标签。其中,<package>允许分离和模块化的配置。这是非常有用的,当你有一个大的项目,项目被划分成不同的模块。
再说了,如果项目有三个域名 - business_applicaiton,customer_application和staff_application,可以创建三个包,在适当的包装和存储相关的行动。包装标签具有以下属性:
| 属性 | 描述 |
|---|---|
| name (required) | The unique identifier for the package |
| extends | Which package does this package extend from? By default, we use struts-default as the base package. |
| abstract | If marked true, the package is not available for end user consumption. |
| namesapce | Unique namespace for the actions |
常量标签name和value属性将被用来覆盖default.properties中定义的属性,就像我们刚刚成立struts.devModeproperty。设置struts.devMode属性,让我们看到了更多的调试信息,日志文件中。
我们定义动作标记对应的每一个URL,我们想访问我们定义了一个类的execute()方法,将访问时,我们将访问相应的URL。
结果确定什么被返回到浏览器的一个动作后执行。从操作返回的字符串应该是一个结果的名称。结果如上配置的每次动作,或作为一个“全局”的结果,在包中的每一个动作可。结果有可选的名称和类型的属性。默认名称值是“成功”。
随着时间的推移,struts.xml文件可以做大,打破它包的模块化是一种方式,但Struts提供了另一种模块化的struts.xml文件。你可以将档案分割成多个XML文件,并将其导入以下方式。
<?xml version="1.0" encoding="UTF-8"?>
<!DOCTYPE struts PUBLIC
    "-//Apache Software Foundation//DTD Struts Configuration 2.0//EN"
    "http://struts.apache.org/dtds/struts-2.0.dtd">
<struts>
     <include file="my-struts1.xml"/>
     <include file="my-struts2.xml"/>
</struts>
我们还没有涉及到的其他配置文件是struts-default.xml中。这个文件包含了Struts标准配置设置,在你的项目的99.99%就不会碰这些设置。出于这个原因,我们不打算在这个文件太多的细节。如果有兴趣,不妨看看在default.properties文件中struts2的核心-2.2.3.jar文件。
struts-config.xml 文件:
struts-config.xml配置文件是一个在Web客户端组件的视图和模型之间的联系,但你的项目的99.99就不会碰这些设置%。基本的配置文件包含以下主要内容:
| SN | Interceptor & 描述 |
|---|---|
| 1 |
struts-config This is the root node of the configuration file. |
| 2 |
form-beans This is where you map your ActionForm subclass to a name. You use this name as an alias for your ActionForm throughout the rest of the struts-config.xml file, and even on your JSP pages. |
| 3 |
global forwards This section maps a page on your webapp to a name. You can use this name to refer to the actual page. This avoids hardcoding URLs on your web pages. |
| 4 |
action-mappings This is where you declare form handlers and they are also known as action mappings. |
| 5 |
controller This section configures Struts internals and rarely used in practical situations. |
| 6 |
plug-in This section tells Struts where to find your properties files, which contain prompts and error messages |
下面是示例struts-config.xml文件:
<?xml version="1.0" encoding="ISO-8859-1" ?>
<!DOCTYPE struts-config PUBLIC
"-//Apache Software Foundation//DTD Struts Configuration 1.0//EN"
"http://jakarta.apache.org/struts/dtds/struts-config_1_0.dtd">

<struts-config>

   <!-- ========== Form Bean Definitions ============ -->
   <form-beans>
      <form-bean name="login" type="test.struts.LoginForm" />
   </form-beans>

   <!-- ========== Global Forward Definitions ========= -->
   <global-forwards>
   </global-forwards>

   <!-- ========== Action Mapping Definitions ======== -->
   <action-mappings>
      <action
         path="/login"
         type="test.struts.LoginAction" >

         <forward name="valid" path="/jsp/MainMenu.jsp" />
         <forward name="invalid" path="/jsp/LoginView.jsp" />
      </action>
   </action-mappings>

   <!-- ========== Controller Definitions ======== -->
   <controller
      contentType="text/html;charset=UTF-8"
      debug="3"
      maxFileSize="1.618M"
      locale="true"
      nocache="true"/>

</struts-config>
struts-config.xml文件的更多详细信息,请检查你的Struts文档。
struts.properties文件
此配置文件提供了一种机制来更改默认行为的框架。其实所有的struts.propertiesconfiguration文件中包含的属性也可以被配置在web.xml中使用的init-param,以及在struts.xml中的配置文件中使用恒定的标签。你可以创建此文件下folderWEB-INF/classes。
在这个文件中配置的值将覆盖默认值配置在default.properties这是包含在Struts2-core-xyzjar分布。有几个可能会考虑改变使用struts.properties文件的属性:
### When set to true, Struts will act much more friendly for developers
struts.devMode = true

### Enables reloading of internationalization files
struts.i18n.reload = true

### Enables reloading of XML configuration files
struts.configuration.xml.reload = true

### Sets the port that the server is run on
struts.url.http.port = 8080
任何与井号(#)开头的行会被假定为注释和由Struts2将被忽略。
Struts 2 动作Actions:
动作是Struts2框架的核心,因为它们是任何MVC(模型 - 视图 - 控制器)框架。每一个URL映射到一个具体的行动,它提供了处理用户的请求提供服务所需的逻辑。
但动作也用来在另外两个重要的能力。首先,动作从请求中的数据的传输,通过到视图中起着重要的作用,无论是其一个JSP的或其它类型的结果。二,行动要协助的框架中确定的结果应该渲染视图将返回响应的要求。
创建动作-Action:
在Struts2的行动,唯一的要求是,必须有一个无参数的方法,该方法返回一个字符串或结果的对象,必须是一个POJO。如果不带参数的方法不指定,则默认行为是使用execute()方法。
您也可以选择扩展ActionSupport类实现接口,包括操作界面。操作界面如下:
public interface Action {
   public static final String SUCCESS = "success";
   public static final String NONE = "none";
   public static final String ERROR = "error";
   public static final String INPUT = "input";
   public static final String LOGIN = "login";
   public String execute() throws Exception;
}
让我们一起来看看在动作方法中的Hello World示例:
package com.yiibai.struts2;

public class HelloWorldAction{
   private String name;

   public String execute() throws Exception {
      return "success";
   }

   public String getName() {
      return name;
   }

   public void setName(String name) {
      this.name = name;
   }
}
为了说明这一点的操作方法控制视图,让我们作出以下更改execute()方法和扩展的类ActionSupport如下:
package com.yiibai.struts2;

import com.opensymphony.xwork2.ActionSupport;

public class HelloWorldAction extends ActionSupport{
   private String name;

   public String execute() throws Exception {
      if ("SECRET".equals(name))
      {
         return SUCCESS;
      }else{
         return ERROR;
      }
   }

   public String getName() {
      return name;
   }

   public void setName(String name) {
      this.name = name;
   }
}
在这个例子中,我们在execute方法中有一些逻辑,看的name属性。如果属性等于“不能说的秘密”的字符串,返回成功的结果,否则返回错误的结果。因为我们已经扩展了ActionSupport,所以我们可以使用字符串常量的成功和错误。现在,让我们修改我们的struts.xml文件如下:
<?xml version="1.0" encoding="UTF-8"?>
<!DOCTYPE struts PUBLIC
   "-//Apache Software Foundation//DTD Struts Configuration 2.0//EN"
   "http://struts.apache.org/dtds/struts-2.0.dtd">
   <struts>
      <constant name="struts.devMode" value="true" />
      <package name="helloworld" extends="struts-default">
         <action name="hello"
            class="com.yiibai.struts2.HelloWorldAction"
            method="execute">
            <result name="success">/HelloWorld.jsp</result>
            <result name="error">/AccessDenied.jsp</result>
         </action>
      </package>
</struts>
创建一个视图
让我们创建下面的JSP文件的helloWorld.jsp,在WebContent文件夹在你的eclipse项目。要做到这一点,右键单击WebContent文件夹中的项目资源管理器,然后选择“新建”>“JSP文件。该文件将被要求的情况下,返回的结果是success,这是一个字符串常量“成功”的定义在Action接口:
<%@ page contentType="text/html; charset=UTF-8" %>
<%@ taglib prefix="s" uri="/struts-tags" %>
<html>
<head>
<title>Hello World</title>
</head>
<body>
   Hello World, <s:property value="name"/>
</body>
</html>
以下是文件,该文件将被调用的框架的情况下作用的结果是等于字符串常量“ERROR”的错误,这是。以下内容的AccessDenied.jsp的
<%@ page contentType="text/html; charset=UTF-8" %>
<%@ taglib prefix="s" uri="/struts-tags" %>
<html>
<head>
<title>Access Denied</title>
</head>
<body>
   You are not authorized to view this page.
</body>
</html>
我们还需要在WebContent文件夹中创建的index.jsp。该文件将作为初始动作URL,用户可以直接点击告诉Struts 2框架,以调用execute方法HelloWorldAction类,并呈现HelloWorld.jsp视图。
<%@ page language="java" contentType="text/html; charset=ISO-8859-1"
   pageEncoding="ISO-8859-1"%>
<%@ taglib prefix="s" uri="/struts-tags"%>
   <!DOCTYPE html PUBLIC "-//W3C//DTD HTML 4.01 Transitional//EN"
"http://www.w3.org/TR/html4/loose.dtd">
<html>
<head>
<title>Hello World</title>
</head>
<body>
   <h1>Hello World From Struts2</h1>
   <form action="hello">
      <label for="name">Please enter your name</label><br/>
      <input type="text" name="name"/>
      <input type="submit" value="Say Hello"/>
   </form>
</body>
</html>
就是这样,有没有需要改变的web.xml文件,让我们使用同一个web.xml举例章节,我们已经创建了。现在,我们已经准备好来运行我们的Hello World应用程序使用Struts 2框架。
执行应用程序
右键点击项目名称,并单击“导出”> WAR文件创建一个WAR文件。然后这WAR部署在Tomcat的webapps目录下。最后启动Tomcat服务器,并尝试访问URL http://localhost:8080/HelloWorldStruts2/index.jsp。这会给你以下画面:
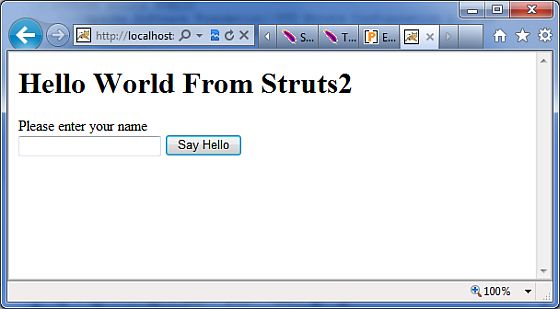
让我们一起进入一个“SECRET”的话,你应该看到下面的页面:

现在输入任何文字以外的“SECRET”,你应该看到下面的页面:
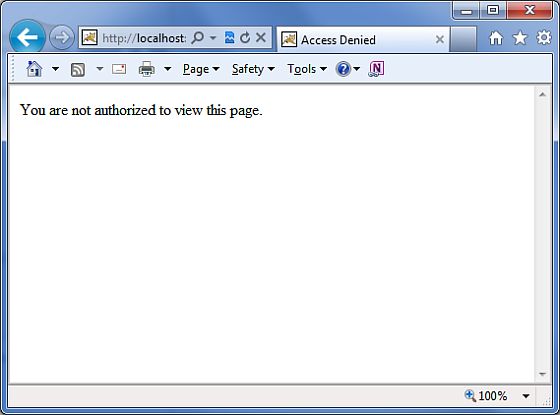
创建多个动作:
我们通常会定义一个以上的行动,以处理不同的请求,向用户提供不同的URL,因此,你可以定义不同的类定义如下:
package com.yiibai.struts2;
import com.opensymphony.xwork2.ActionSupport;

   class MyAction extends ActionSupport{
      public static String GOOD = SUCCESS;
      public static String BAD = ERROR;
   }

   public class HelloWorld extends ActionSupport{
      ...
      public String execute()
      {
         if ("SECRET".equals(name)) return MyAction.GOOD;
         return MyAction.BAD;
      }
      ...
   }

   public class SomeOtherClass extends ActionSupport{
      ...
      public String execute()
      {
         return MyAction.GOOD;
      }
      ...
   }
您将在struts.xml文件中配置这些操作如下:
<?xml version="1.0" encoding="UTF-8"?>
<!DOCTYPE struts PUBLIC
    "-//Apache Software Foundation//DTD Struts Configuration 2.0//EN"
    "http://struts.apache.org/dtds/struts-2.0.dtd">
struts>
 <constant name="struts.devMode" value="true" />
   <package name="helloworld" extends="struts-default">
      <action name="hello"
         class="com.yiibai.struts2.HelloWorld"
         method="execute">
         <result name="success">/HelloWorld.jsp</result>
         <result name="error">/AccessDenied.jsp</result>
      </action>
      <action name="something"
         class="com.yiibai.struts2.SomeOtherClass"
         method="execute">
         <result name="success">/Something.jsp</result>
         <result name="error">/AccessDenied.jsp</result>
      </action>
   </package>
</struts>
在上述假设的例子中,你可以看到操作的结果被复制SUCCESS 和ERROR 。为了解决这个问题,我们建议您创建一个类,它包含的结果的结果。
Struts 2 拦截器:
拦截器是作为Servlet过滤器或JDK的Proxy类的概念上是相同的。拦截器允许横切功能单独实现动作以及框架。想要使用拦截器,可以实现如下:
-
Providing preprocessing logic before the action is called.
-
Providing postprocessing logic after the action is called.
-
Catching exceptions so that alternate processing can be performed.
使用拦截器在Struts2框架提供的功能很多,例如包括异常处理,文件上传,生命周期回调和验证等。事实上,Struts2的基地很多其拦截功能上,这不是不可能有7或8每个动作拦截分配。
Struts2框架拦截器:
Struts 2框架提供了良好的预配置,并准备使用的盒拦截。下面列出了几个重要的拦截器:
| SN | Interceptor & 描述 |
|---|---|
| 1 |
alias Allows parameters to have different name aliases across requests. |
| 2 |
checkbox Assists in managing check boxes by adding a parameter value of false for check boxes that are not checked. |
| 3 |
conversionError Places error information from converting strings to parameter types into the action's field errors. |
| 4 |
createSession Automatically creates an HTTP session if one does not already exist. |
| 5 |
debugging Provides several different debugging screens to the developer. |
| 6 |
execAndWait Sends the user to an intermediary waiting page while the action executes in the background. |
| 7 |
exception Maps exceptions that are thrown from an action to a result, allowing automatic exception handling via redirection. |
| 8 |
fileUpload Facilitates easy file uploading. |
| 9 |
i18n Keeps track of the selected locale during a user's session. |
| 10 |
logger Provides simple logging by outputting the name of the action being executed. |
| 11 |
params Sets the request parameters on the action. |
| 12 |
prepare This is typically used to do pre-processing work, such as setup database connections. |
| 13 |
profile Allows simple profiling information to be logged for actions. |
| 14 |
scope Stores and retrieves the action's state in the session or application scope. |
| 15 |
ServletConfig Provides the action with access to various servlet-based information. |
| 16 |
timer Provides simple profiling information in the form of how long the action takes to execute. |
| 17 |
token Checks the action for a valid token to prevent duplicate formsubmission. |
| 18 |
validation Provides validation support for actions |
完整的细节上面提到的拦截,请loook到Struts2文档。但我会告诉你如何使用拦截器,一般在你的Struts应用程序。
如何使用拦截器?
让我们来看看如何使用一个已经存在的拦截我们的“Hello World”程序。我们将使用定时器拦截器,其目的是测量过了多长时间,执行相应的操作方法。同时我PARAMS拦截器,其目的是发送的请求参数的行动。您可以尝试不使用这个拦截器和你的榜样,你会发现,name属性没有被设置的参数是不能够达到给动作。
我们将继续HelloWorldAction.java,web.xml中,HelloWorld.jsp和index.jsp文件,因为他们已经创建的实例章,但让我们如下修改struts.xml文件中添加一个拦截器
<?xml version="1.0" encoding="UTF-8"?>
<!DOCTYPE struts PUBLIC
   "-//Apache Software Foundation//DTD Struts Configuration 2.0//EN"
   "http://struts.apache.org/dtds/struts-2.0.dtd">
<struts>
   <constant name="struts.devMode" value="true" />
   <package name="helloworld" extends="struts-default">
      <action name="hello"
         class="com.yiibai.struts2.HelloWorldAction"
         method="execute">
         <interceptor-ref name="params"/>
         <interceptor-ref name="timer" />
         <result name="success">/HelloWorld.jsp</result>
      </action>
   </package>
</struts>
右键点击项目名称,并单击“导出”> WAR文件创建一个WAR文件。然后,这WAR部署在Tomcat的webapps目录下。最后,启动Tomcat服务器,并尝试访问URL http://localhost:8080/HelloWorldStruts2/index.jsp。这会给你以下画面:
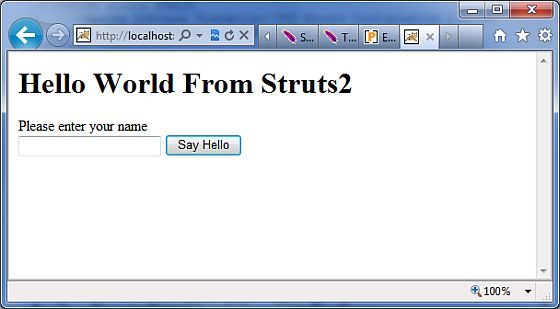
现在,在给定的文本框中输入任何单词,然后单击“Say Hello按钮执行已定义的动作。现在如果你将检查生成的日志,你会发现下面的文字:
INFO: Server startup in 3539 ms
27/08/2011 8:40:53 PM
com.opensymphony.xwork2.util.logging.commons.CommonsLogger info
INFO: Executed action [//hello!execute] took 109 ms.
这里的底线是产生,因为定时器拦截行动,告诉了要执行的总109ms
创建自定义拦截器
在应用程序中使用自定义拦截器是一个优雅的方式来提供跨领域的应用功能。创建一个自定义拦截器是容易的,需要扩展的接口,下面Interceptor接口内容:
public interface Interceptor extends Serializable{
   void destroy();
   void init();
   String intercept(ActionInvocation invocation)
   throws Exception;
}
正如其名称所表明的,在init()方法提供了一种方法来初始化拦截器destroy()方法提供了一个拦截器净化设施。不同的行动,拦截器的请求重用和需要是线程安全的,特别是在intercept()方法。
ActionInvocation对象提供的运行时环境。它允许访问的行动本身和方法调用的行动和决定的行动是否已经调用。
如果您有没有必要的初始化或清理代码,AbstractInterceptor类可以扩展。这提供了一个默认的无操作实现 init() 和destroy()方法。
创建拦截器类:
让我们创建MyInterceptor.java在Java资源> src文件夹:
package com.yiibai.struts2;

import java.util.*;
import com.opensymphony.xwork2.ActionInvocation;
import com.opensymphony.xwork2.interceptor.AbstractInterceptor;

public class MyInterceptor extends AbstractInterceptor {

   public String intercept(ActionInvocation invocation)throws Exception{

      /* let us do some pre-processing */
      String output = "Pre-Processing";
      System.out.println(output);

      /* let us call action or next interceptor */
      String result = invocation.invoke();

      /* let us do some post-processing */
      output = "Post-Processing";
      System.out.println(output);

      return result;

   }
}
就像你看到的,实际的动作将使用拦截器执行的invocation.invoke()调用。所以,你可以做一些前处理和后处理根据您的需要。
框架本身开始的过程,在第一次调用ActionInvocation对象的invoke()。每次invoke()被调用,ActionInvocation咨询状态并执行拦截。当所有配置的拦截器被调用,invoke()方法将导致要执行的动作本身。通过请求流以下数据图显示了相同的概念:

创建一个动作-Action类:
让我们创建一个Java文件HelloWorldAction.java的Java资源> SRC下一个的包名com.yiibai.struts2与下面的内容。
package com.yiibai.struts2;

import com.opensymphony.xwork2.ActionSupport;

public class HelloWorldAction extends ActionSupport{
   private String name;

   public String execute() throws Exception {
      System.out.println("Inside action....");
      return "success";
   }

   public String getName() {
      return name;
   }

   public void setName(String name) {
      this.name = name;
   }
}
在前面的例子中,我们已经看到,这是一个相同的类。我们有标准“name”属性getter和setter方法,返回字符串“success”执行方法。
创建视图
Let us create the below jsp file HelloWorld.jsp in the WebContent folder in your eclipse project.
<%@ page contentType="text/html; charset=UTF-8" %>
<%@ taglib prefix="s" uri="/struts-tags" %>
<html>
<head>
<title>Hello World</title>
</head>
<body>
   Hello World, <s:property value="name"/>
</body>
</html>
创建视图:
我们还需要在WebContent文件夹中创建的index.jsp。该文件将作为初始动作URL,用户可以直接点击告诉Struts 2框架调用HelloWorldAction类定义的方法,使HelloWorld.jsp视图。
<%@ page language="java" contentType="text/html; charset=ISO-8859-1"
   pageEncoding="ISO-8859-1"%>
<%@ taglib prefix="s" uri="/struts-tags"%>
   <!DOCTYPE html PUBLIC "-//W3C//DTD HTML 4.01 Transitional//EN"
"http://www.w3.org/TR/html4/loose.dtd">
<html>
<head>
<title>Hello World</title>
</head>
<body>
   <h1>Hello World From Struts2</h1>
   <form action="hello">
      <label for="name">Please enter your name</label><br/>
      <input type="text" name="name"/>
      <input type="submit" value="Say Hello"/>
   </form>
</body>
</html>
hello操作定义在上面的视图文件将被映射到的HelloWorldAction类和它的执行方法使用struts.xml文件。
配置文件
现在,我们需要注册我们的拦截器,然后调用它,因为我们已经在前面的例子中默认的拦截器。要注册一个新定义的拦截器<interceptors>...</interceptors>标签直接放在下的<package>的标记插件struts.xml文件。您可以跳过这一步,因为我们没有一个默认的拦截器在前面的例子。但在这里,让我们的注册和使用,如下所示:
<?xml version="1.0" encoding="UTF-8"?>
<!DOCTYPE struts PUBLIC
    "-//Apache Software Foundation//DTD Struts Configuration 2.0//EN"
    "http://struts.apache.org/dtds/struts-2.0.dtd">

<struts>
   <constant name="struts.devMode" value="true" />
   <package name="helloworld" extends="struts-default">

      <interceptors>
         <interceptor name="myinterceptor"
            class="com.yiibai.struts2.MyInterceptor" />
      </interceptors>

      <action name="hello"
         class="com.yiibai.struts2.HelloWorldAction"
         method="execute">
         <interceptor-ref name="params"/>
         <interceptor-ref name="myinterceptor" />
         <result name="success">/HelloWorld.jsp</result>
      </action>

   </package>
</struts>
应该注意的是,你可以注册多个拦截器<package>标签内,同一时间可以调用多个拦截器内的<action>标签。可以调用相同的拦截器与不同的动作。
需要创建WebContent/WEB-INF文件夹下web.xml文件下如下:
<?xml version="1.0" encoding="UTF-8"?>
<web-app xmlns:xsi="http://www.w3.org/2001/XMLSchema-instance"
   xmlns="http://java.sun.com/xml/ns/javaee"
   xmlns:web="http://java.sun.com/xml/ns/javaee/web-app_2_5.xsd"
   xsi:schemaLocation="http://java.sun.com/xml/ns/javaee
   http://java.sun.com/xml/ns/javaee/web-app_3_0.xsd"
   id="WebApp_ID" version="3.0">

   <display-name>Struts 2</display-name>
   <welcome-file-list>
      <welcome-file>index.jsp</welcome-file>
   </welcome-file-list>
   <filter>
      <filter-name>struts2</filter-name>
      <filter-class>
         org.apache.struts2.dispatcher.FilterDispatcher
      </filter-class>
   </filter>

   <filter-mapping>
      <filter-name>struts2</filter-name>
      <url-pattern>/*</url-pattern>
   </filter-mapping>
</web-app>
右键点击项目名称,并单击“导出”> WAR文件创建一个WAR文件。然后,这WAR部署在Tomcat的webapps目录下。最后,启动Tomcat服务器,并尝试访问URL http://localhost:8080/HelloWorldStruts2/index.jsp。这会给你以下画面:
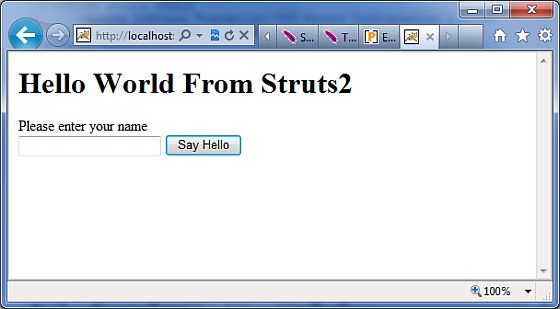
现在,在给定的文本框中输入任何单词,然后单击“Say Hello按钮执行已定义的动作。现在,如果你将检查生成的日志,你会发现下面的文字在底部:
Pre-Processing
Inside action....
Post-Processing
堆叠多个拦截器:
正如你想像,配置多个拦截器的每个动作很快就会变得非常难以控制。出于这个原因,拦截器的拦截器栈管理。下面是一个例子,直接从在struts-default.xml文件:
<interceptor-stack name="basicStack">
   <interceptor-ref name="exception"/>
   <interceptor-ref name="servlet-config"/>
   <interceptor-ref name="prepare"/>
   <interceptor-ref name="checkbox"/>
   <interceptor-ref name="params"/>
   <interceptor-ref name="conversionError"/>
</interceptor-stack>
上述权被称为basicStack,并且可以用于在您的配置中,如下所示。此配置节点被放置下<package.../>节点。每个<interceptor-ref.../>标签引用了一个拦截器或拦截器栈已配置在当前的拦截器栈。因此,这是非常重要的,以确保名称是唯一在所有拦截器和拦截器栈配置时,配置初始拦截器和拦截器栈。
我们已经看到了如何应用拦截器的作用,应用拦截器栈是没有什么不同。事实上,我们都使用完全相同的标签:
<action name="hello" class="com.yiibai.struts2.MyAction">
   <interceptor-ref name="basicStack"/>
   <result>view.jsp</result>
</action
所有的6个拦截器,上述登记注册完成股权“basicStack”hello操作。他们在配置应该指出的是拦截器执行的顺序。例如,在上述情况下,异常将被执行第一,servlet配置第二等。
Struts 2 Results and Result Types
正如前面提到的,<results>标签Struts2的MVC框架的视图中所扮演的角色。动作是负责执行业务逻辑。执行业务逻辑后,下一步是使用<results>标签显示视图。
经常有一些导航规则附加的结果。例如,如果在动作方法是对用户进行验证,有三种可能的结果。 (a)成功登录失败的登录. (b)用户名或密码不正确.(c)帐户锁定。
的操作方法在这种情况下,将配置有三种可能的结果字符串和三种不同的视图呈现结果。在前面的例子我们已经看到。
但是,Struts2不配合使用JSP作为视图技术。毕竟了MVC模式的整个目的是保持层分离和高度可配置。例如,对于一个Web2.0客户端,您可能要返回XML或JSON作为输出。在这种情况下,你可以创建一个新的结果类型为XML或JSON,实现这一目标。
Struts的一些预定义的结果类型,无论我们已经看到了,这是默认的结果类型,这是用来调度派遣到JSP页面。 Struts允许使用的其他标记语言的技术,目前的结果和流行的选择,包括Velocity, Freemaker, XSLT 和Tiles。
分发调度结果类型:
调度的结果类型是默认的类型,是用来指定,如果没有其他的结果类型。它被用来转发到一个servlet,JSP,HTML页面等等,在服务器上它使用RequestDispatcher.forward()方法。
在我们前面的例子中,我们看到了“shorthand”版本,在这里我们提供了一个JSP的路径作为身体的结果标记。
<result name="success">
   /HelloWorld.jsp
</result>
We can also specify the JSP file using a <param name="location"> tag within the <result...> element as follows:
<result name="success" type="dispatcher">
   <param name="location">
      /HelloWorld.jsp
   </param >
</result>
我们还可以提供一个分析参数,默认值是true。解析参数的位置参数确定是否将被解析为OGNL表达式。
FreeMaker结果类型:
在这个例子中,我们将看到我们如何使用FreeMaker作为视图技术。 freemaker是一种流行的模板引擎,用于生成输出,使用预定义的模板。让我们创建一个Freemaker模板文件hello.fm以下内容:
Hello World ${name}
在此以上的文件是一个模板,其中名称是使用已定义的动作外,将通过放慢参数。在你的CLASSPATH中将保存该文件。接下来让我们修改struts.xml中指定的结果如下:
<?xml version="1.0" encoding="UTF-8"?>
<!DOCTYPE struts PUBLIC
"-//Apache Software Foundation//DTD Struts Configuration 2.0//EN"
"http://struts.apache.org/dtds/struts-2.0.dtd">

<struts>
   <constant name="struts.devMode" value="true" />
   <package name="helloworld" extends="struts-default">

      <action name="hello"
         class="com.yiibai.struts2.HelloWorldAction"
         method="execute">
         <result name="success" type="freemarker">
            <param name="location">/hello.fm</param>
         </result>
      </action>

   </package>

</struts>
让我们保持我们的HelloWorldAction.java,HelloWorldAction.jsp和index.jsp文件,为我们创造了他们的例子章。现在,右键单击该项目上的名称和clickExport> WAR文件创建一个WAR文件。然后,这WAR部署在Tomcat的webapps目录下。最后,启动Tomcat服务器,并尝试访问URL http://localhost:8080/HelloWorldStruts2/index.jsp。这会给你以下画面:
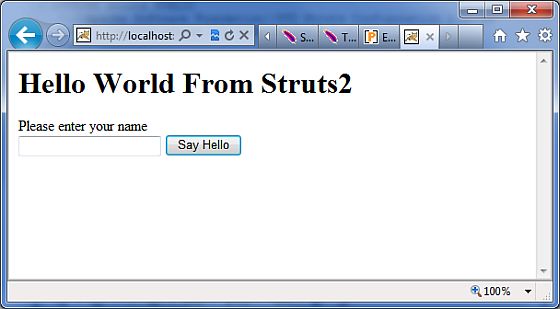
值“Struts2”,并提交页面。您应该看到下一页
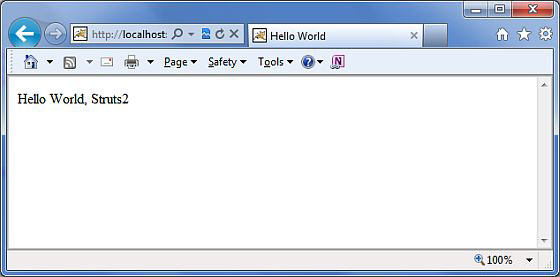
正如你可以看到,这是完全一样的不同之处在于,我们是不依赖于使用JSP作为视图技术的JSP视图。在这个例子中,我们已经使用Freemaker。
重定向结果类型:
重定向结果的类型调用标准 response.sendRedirect() 方法,使浏览器来创建一个新的请求给定的位置。
我们可以提供的位置无论是在体内的<result...>元素或作为一个<param name="location">元素。重定向也支持解析的参数。下面是一个例子使用XML配置:
<action name="hello"
   class="com.yiibai.struts2.HelloWorldAction"
   method="execute">
   <result name="success" type="redirect">
       <param name="location">
         /NewWorld.jsp
      </param >
   </result>
</action>
因此,只要修改struts.xml文件中定义重定向上述类型,并创建一个新的的文件NewWorld.jpg在那里你会被重定向hello操作时,将返回成功。
Struts2值栈/ OGNL
值栈:
值栈是一组的几个对象保持中的下列对象提供的顺序:
| SN | Objects & 描述 |
|---|---|
| 1 |
Temporary Objects There are various temporary objects which are created during execution of a page. For example the current iteration value for a collection being looped over in a JSP tag. |
| 2 |
The Model Object If you are using model objects in your struts application, the current model object is placed before the action on the value stack |
| 3 |
The Action Object This will be the current action object which is being executed. |
| 4 |
Named Objects These objects include #application, #session, #request, #attr and #parameters and refer to the corresponding servlet scopes |
值栈可以通过标签提供JSP,Velocity或者Freemarker的。在单独的章节中,我们将研究有不同的标签,被用来获取和设置Struts 2.0的值栈。您可以在你的行动值栈对象如下:
ActionContext.getContext().getValueStack()
一旦你拥有了值对象,您可以使用以下方法来操作该对象:
| SN | ValueStack Methods & 描述 |
|---|---|
| 1 |
Object findValue(String expr) Find a value by evaluating the given expression against the stack in the default search order. |
| 2 |
CompoundRoot getRoot() Get the CompoundRoot which holds the objects pushed onto the stack. |
| 3 |
Object peek() Get the object on the top of the stack without changing the stack. |
| 4 |
Object pop() Get the object on the top of the stack and remove it from the stack. |
| 5 |
void push(Object o) Put this object onto the top of the stack. |
| 6 |
void set(String key, Object o) Sets an object on the stack with the given key so it is retrievable by findValue(key,...) |
| 7 |
void setDefaultType(Class defaultType) Sets the default type to convert to if no type is provided when getting a value. |
| 8 |
void setValue(String expr, Object value) Attempts to set a property on a bean in the stack with the given expression using the default search order. |
| 9 |
int size() Get the number of objects in the stack. |
OGNL:
对象图导航语言(OGNL)是一个功能强大的表达式语言,用于引用和操作数据的值栈。OGNL还可以在数据传输和类型转换。
OGNL是非常相似的JSP表达式语言。 OGNL是基于的思想具有根或缺省对象的范围内的。默认的根对象的属性可以参考使用的标记符号,这是英镑符号。
正如前面提到的,OGNL根据上下文和Struts建立一个ActionContext中使用OGNL地图。ActionContext中的地图由下列组成:
-
application - 应用程序范围内的变量
-
session - 会话范围的变量
-
root / value stack -所有操作变量都存储在这里
-
request - 请求范围的变量
-
parameters - 请求参数
-
atributes - 存储的属性页面,请求,会话和应用范围
重要的是要明白,值栈中的操作对象是始终可用。所以,因此,如果你的行动对象的属性x和y有随时可供您使用。
在ActionContext中的对象被称为使用英镑符号,但是,值栈中的对象可以直接引用,例如,如果员工是一个动作类的属性的话,就可以得到参考如下:
<s:property value="name"/>
而不是
<s:property value="#name"/>
如果你有所谓的“login”会话中的属性,你可以找回如下:
<s:property value="#session.login"/>
OGNL还支持处理的集合 - 即地图,List和Set。例如,以显示颜色的下拉列表中,你可以这样做:
<s:select name="color" list="{'red','yellow','green'}" />
OGNL表达式是巧妙地解释了 "red","yellow","green"颜色和此基础上建立一个列表。
OGNL表达式将被广泛使用在接下来的章节中,我们将研究不同的标签。因此,而不是孤立地看着他们,让我们来看看的表格标签/控制标签/数据标签和Ajax标签部分在使用中的一些例子。
值栈/OGNL例:
创建动作:
让我们考虑下面的操作类,我们访问值栈,然后设置几个键,我们将在我们的观点,即访问使用OGNL。JSP页面。
package com.yiibai.struts2;

import java.util.*;

import com.opensymphony.xwork2.util.ValueStack;
import com.opensymphony.xwork2.ActionContext;
import com.opensymphony.xwork2.ActionSupport;

public class HelloWorldAction extends ActionSupport{
   private String name;

   public String execute() throws Exception {
      ValueStack stack = ActionContext.getContext().getValueStack();
      Map<String, Object> context = new HashMap<String, Object>();

      context.put("key1", new String("This is key1"));
      context.put("key2", new String("This is key2"));
      stack.push(context);

      System.out.println("Size of the valueStack: " + stack.size());
      return "success";
   }

   public String getName() {
      return name;
   }

   public void setName(String name) {
      this.name = name;
   }
}
其实,Struts 2增加值栈的顶部时动作执行。因此,通常的方法把东西值栈是增加值getter/setter方法Action类和然后使用<s:property>的标签,访问值。但我展示你究竟是如何的ActionContext中和值栈在struts的工作。
创建视图
让我们创建下面的JSP文件helloWorld.jsp,在WebContent文件夹在eclipse项目。这种观点的情况下采取行动的成功返回,将显示:
<%@ page contentType="text/html; charset=UTF-8" %>
<%@ taglib prefix="s" uri="/struts-tags" %>
<html>
<head>
<title>Hello World</title>
</head>
<body>
   Entered value : <s:property value="name"/><br/>
   Value of key 1 : <s:property value="key1" /><br/>
   Value of key 2 : <s:property value="key2" /> <br/>
</body>
</html>
我们还需要创建index.jsp在WebContent文件夹下,其内容如下:
<%@ page language="java" contentType="text/html; charset=ISO-8859-1"
   pageEncoding="ISO-8859-1"%>
<%@ taglib prefix="s" uri="/struts-tags"%>
   <!DOCTYPE html PUBLIC "-//W3C//DTD HTML 4.01 Transitional//EN"
"http://www.w3.org/TR/html4/loose.dtd">
<html>
<head>
<title>Hello World</title>
</head>
<body>
   <h1>Hello World From Struts2</h1>
   <form action="hello">
      <label for="name">Please enter your name</label><br/>
      <input type="text" name="name"/>
      <input type="submit" value="Say Hello"/>
   </form>
</body>
</html>
配置文件
以下是struts.xml文件的内容:
<?xml version="1.0" encoding="UTF-8"?>
<!DOCTYPE struts PUBLIC
    "-//Apache Software Foundation//DTD Struts Configuration 2.0//EN"
    "http://struts.apache.org/dtds/struts-2.0.dtd">

<struts>
   <constant name="struts.devMode" value="true" />
   <package name="helloworld" extends="struts-default">

      <action name="hello"
         class="com.yiibai.struts2.HelloWorldAction"
         method="execute">
         <result name="success">/HelloWorld.jsp</result>
      </action>

   </package>
</struts>
以下是web.xml文件中的内容:
<?xml version="1.0" encoding="UTF-8"?>
<web-app xmlns:xsi="http://www.w3.org/2001/XMLSchema-instance"
   xmlns="http://java.sun.com/xml/ns/javaee"
   xmlns:web="http://java.sun.com/xml/ns/javaee/web-app_2_5.xsd"
   xsi:schemaLocation="http://java.sun.com/xml/ns/javaee
   http://java.sun.com/xml/ns/javaee/web-app_3_0.xsd"
   id="WebApp_ID" version="3.0">

   <display-name>Struts 2</display-name>
   <welcome-file-list>
      <welcome-file>index.jsp</welcome-file>
   </welcome-file-list>
   <filter>
      <filter-name>struts2</filter-name>
      <filter-class>
         org.apache.struts2.dispatcher.FilterDispatcher
      </filter-class>
   </filter>

   <filter-mapping>
      <filter-name>struts2</filter-name>
      <url-pattern>/*</url-pattern>
   </filter-mapping>
</web-app>
右键点击项目名称,并单击“导出”> WAR文件创建一个WAR文件。然后,这WAR部署在Tomcat的webapps目录下。最后,启动Tomcat服务器,并尝试访问URL http://localhost:8080/HelloWorldStruts2/index.jsp。这会给你以下画面:
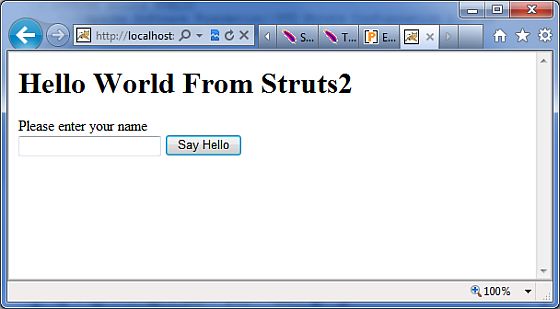
现在,在给定的文本框中输入任何单词,然后点击“Say Hello”按钮执行已定义的动作。现在,如果你将检查生成的日志,你会发现下面的文字在底部:
Size of the valueStack: 3
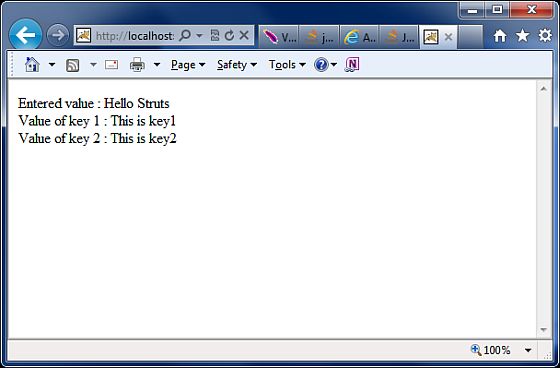
这将显示下面的屏幕,它会显示任何价值,你将进入和值key1和key2,我们赋上了值栈。
结论:
希望你有较好的了解Struts 2概念。如果愿意了解更多的细节和进一步的例子,如上传文件,发送电子邮件,表单验证等,然后可以去通过完整在线教程。

