Android样式示例
下面的例子演示了如何使用Style的一些元素。现在开始创建一个简单的Android应用程序,按照以下步骤:
| 步骤 | 描述 |
|---|---|
| 1 | 使用Android Studio创建一个Android应用程序项目,并将其命名为:StyleDemo |
| 2 | 修改src/MainActivity.java文件,以添加click事件侦听器和处理程序定义的两个按钮 |
| 3 | 定义全局样式在文件 res/values/style.xml ,同时为按钮自定义属性 |
| 4 | 修改 res/layout/activity_main.xml 文件的默认内容包括一套Android的UI控件,并使用所自定义的风格。 |
| 5 | 定义所需的常量在 res/values/strings.xml 文件 |
| 6 | 运行该应用程序启动Android模拟器并验证应用程序所做的修改结果。 |
以下是主活动Activity文件src/ com.yiibai.styledemo/MainActivity.java 文件的内容。这个文件可以包括每个生命周期基本方法。
package com.example.styledemo;

import android.os.Bundle;
import android.app.Activity;
import android.view.Menu;
import android.view.View;
import android.widget.Button;
import android.widget.TextView;

public class MainActivity extends Activity {

    @Override
    protected void onCreate(Bundle savedInstanceState) {
        super.onCreate(savedInstanceState);
        setContentView(R.layout.activity_main);

        //--- find both the buttons---
        Button sButton = (Button) findViewById(R.id.button_s);
        Button lButton = (Button) findViewById(R.id.button_l);

        // -- register click event with first button ---
        sButton.setOnClickListener(new View.OnClickListener() {
           public void onClick(View v) {
               // --- find the text view --
               TextView txtView = (TextView) findViewById(R.id.text_id);
               // -- change text size --
               txtView.setTextSize(20);
           }
        });

        // -- register click event with second button ---
        lButton.setOnClickListener(new View.OnClickListener() {
           public void onClick(View v) {
               // --- find the text view --
               TextView txtView = (TextView) findViewById(R.id.text_id);
               // -- change text size --
               txtView.setTextSize(24);
           }
        });
    }

    @Override
    public boolean onCreateOptionsMenu(Menu menu) {
        getMenuInflater().inflate(R.menu.main, menu);
        return true;
    }

}
将下列 res/values/styles.xml 文件的内容,另外这还有 styleCustomButtonStyle 定义:
<resources>

   <!--
     Base application theme, dependent on API level. This theme is replaced
     by AppBaseTheme from res/values-vXX/styles.xml on newer devices.
   -->
   <style name="AppBaseTheme" parent="android:Theme.Light">
     <!--
         Theme customizations available in newer API levels can go in
         res/values-vXX/styles.xml, while customizations related to
         backward-compatibility can go here.
     -->
   </style>

   <!-- Application theme. -->
   <style name="AppTheme" parent="AppBaseTheme">
     <!-- All customizations that are NOT specific to a particular API-level can go here. -->
   </style>

   <!-- Custom Style defined for the buttons. -->
   <style name="CustomButtonStyle">
      <item name="android:layout_width">100dp</item>
      <item name="android:layout_height">38dp</item>
      <item name="android:capitalize">characters</item>
      <item name="android:typeface">monospace</item>
      <item name="android:shadowDx">1.2</item>
      <item name="android:shadowDy">1.2</item>
      <item name="android:shadowRadius">2</item>
      <item name="android:textColor">#494948</item>/>
      <item name="android:gravity" >center</item>
      <item name="android:layout_margin" >3dp</item>
      <item name="android:textSize" >5pt</item>
      <item name="android:shadowColor" >#000000</item>
   </style>

</resources>
下面是 res/layout/activity_main.xml 文件的内容:
<?xml version="1.0" encoding="utf-8"?>
<LinearLayout xmlns:android="http://schemas.android.com/apk/res/android"
   android:layout_width="fill_parent"
   android:layout_height="fill_parent"
   android:orientation="vertical" >


    <Button
    android:id="@+id/button_s"
    style="@style/CustomButtonStyle"
    android:text="@string/button_small"
    android:onClick="doSmall"/>

    <Button
    android:id="@+id/button_l"
    style="@style/CustomButtonStyle"
    android:text="@string/button_large"
    android:onClick="doLarge"/>

    <TextView
    android:id="@+id/text_id"
    android:layout_width="wrap_content"
    android:layout_height="wrap_content"
    android:capitalize="characters"
    android:text="@string/hello_world" />

</LinearLayout>
下面文件 res/values/strings.xml 的内容中定义两个新的常量:
<?xml version="1.0" encoding="utf-8"?>
<resources>

    <string name="app_name">StyleDemo</string>
    <string name="action_settings">Settings</string>
    <string name="hello_world">Hello world!</string>
   <string name="button_small">Small Font</string>
   <string name="button_large">Large Font</string>

</resources>
以下是AndroidManifest.xml 文件的默认内容:
<?xml version="1.0" encoding="utf-8"?>
<manifest xmlns:android="http://schemas.android.com/apk/res/android"
    package="com.yiibai.guidemo"
    android:versionCode="1"
    android:versionName="1.0" >

    <uses-sdk
        android:minSdkVersion="8"
        android:targetSdkVersion="17" />

    <application
        android:allowBackup="true"
        android:icon="@drawable/ic_launcher"
        android:label="@string/app_name"
        android:theme="@style/AppTheme" >
        <activity
            android:name="com.yiibai.guidemo.MainActivity"
            android:label="@string/app_name" >
            <intent-filter>
                <action android:name="android.intent.action.MAIN" />

                <category android:name="android.intent.category.LAUNCHER" />
            </intent-filter>
        </activity>
    </application>

</manifest>
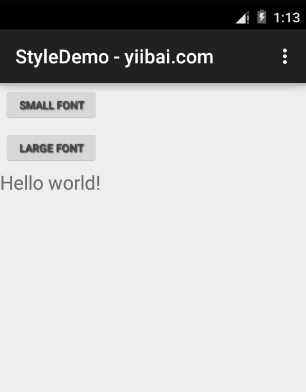
我们尝试运行StyleDemo 应用程序。AVD安装的应用程序,并启动它,如果一切设置和应用都没有问题,它会显示以下模拟器窗口:


